チェンネル入れ替え
はじめに
先日画像処理100本ノックにJavaScriptで挑戦してみた 【画像処理100本ノックJS】という記事を見かけました。
元記事はPythonでの問題集のようです。
100問全部を解くのはなかなか難しいですが、簡単な問題くらいなら私にも解けるのではないかと思い、せっかくなのでSwiftで実装してみることにしました。
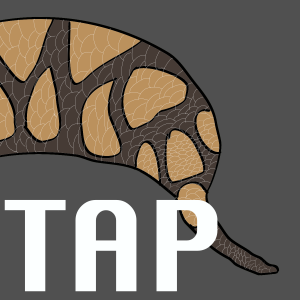
入力画像

入力画像は問題集のイモリの画像ではなく私のアイコンに使っている画像にしました。
今回解く問題がRGBチェンネルの入れ替えなので色味が強い方がわかりやすいかなと思ったからです。
コード
ピクセルの色情報取得
ピクセルの色を判別するためにPixelBufferというクラスを作りました。
getRed, getGreen, getBlue, getAlphaに座標を指定することでピクセルの色を取得します。
class PixelBuffer {
    private var pixelData: Data
    var width: Int
    var height: Int
    private var bytesPerRow: Int
    private let bytesPerPixel = 4 //1ピクセル4バイトのデータ固定

    init?(uiImage: UIImage) {
        guard let cgImage = uiImage.cgImage,
            //R,G,B,A各8Bit
            cgImage.bitsPerComponent == 8,
            cgImage.bitsPerPixel == bytesPerPixel * 8 else {
                return nil

        }
        pixelData = cgImage.dataProvider!.data! as Data
        width = cgImage.width
        height = cgImage.height
        bytesPerRow = cgImage.bytesPerRow
    }

    func getRed(x: Int, y: Int) -> CGFloat {
        let pixelInfo = bytesPerRow * y + x * bytesPerPixel
        let r = CGFloat(pixelData[pixelInfo]) / CGFloat(255.0)

        return r
    }
    func getGreen(x: Int, y: Int) -> CGFloat {
        let pixelInfo = bytesPerRow * y + x * bytesPerPixel
        let green = CGFloat(pixelData[pixelInfo+1]) / CGFloat(255.0)

        return green
    }
    func getBlue(x: Int, y: Int) -> CGFloat {
        let pixelInfo = bytesPerRow * y + x * bytesPerPixel
        let blue = CGFloat(pixelData[pixelInfo+2]) / CGFloat(255.0)

        return blue
    }
    func getAlpha(x: Int, y: Int) -> CGFloat {
        let pixelInfo = bytesPerRow * y + x * bytesPerPixel
        let alpha = CGFloat(pixelData[pixelInfo+3]) / CGFloat(255.0)
        return alpha
    }
}
塗りつぶし
PixelBufferのメソッドを使って取得した色情報をUIImageのextensionでcreateImageというメソッドをました。
1ピクセルごとにCGRectを作成してるので処理が重くなってしまいますが、他に方法を見つけられなかったのでこの方法で実装しました。
extension UIImage {
    func createImage(r:[CGFloat], g: [CGFloat], b:[CGFloat], a:[CGFloat]) -> UIImage {
        UIGraphicsBeginImageContextWithOptions(size, false, 0)
        let wid:Int = Int(size.width)
        let hei:Int = Int(size.height)

        for w in 0..<wid {
            for h in 0..<hei {
                let index = (w * wid) + h
                UIColor(red: r[index], green: g[index], blue: b[index], alpha: a[index]).setFill()
                let drawRect = CGRect(x: w, y: h, width: 1, height: 1)
                UIRectFill(drawRect)
                draw(in: drawRect, blendMode: .destinationIn, alpha: 1)
            }
        }
        let tintedImage = UIGraphicsGetImageFromCurrentImageContext()!
        UIGraphicsEndImageContext()
        return tintedImage
    }
}
呼び出し元
    override func viewDidLoad() {
        super.viewDidLoad()
        let img = UIImage(named: "harumi")!

        // ピクセルごとの色情報の取得
        if let pixelBuffer = PixelBuffer(uiImage: img) {
            for x in 0..<pixelBuffer.width {
                for y in 0..<pixelBuffer.height {
                    r.append(pixelBuffer.getRed(x: x, y: y))
                    g.append(pixelBuffer.getBlue(x: x, y: y))
                    b.append(pixelBuffer.getGreen(x: x, y: y))
                    a.append(pixelBuffer.getAlpha(x: x, y: y))
                }
            }
        } else {
            print("image not format")
        }
        //rgbの入れ替え
        image.image = img.createImage(r: g, g: b, b: r, a: a)
    }
}
コード一覧
import UIKit

class ViewController: UIViewController {
    @IBOutlet weak var image: UIImageView!

    var r:[CGFloat] = []
    var g:[CGFloat] = []
    var b:[CGFloat] = []
    var a:[CGFloat] = []

    override func viewDidLoad() {
        super.viewDidLoad()
        let img = UIImage(named: "harumi")!

        // ピクセルごとの色情報の取得
        if let pixelBuffer = PixelBuffer(uiImage: img) {
            for x in 0..<pixelBuffer.width {
                for y in 0..<pixelBuffer.height {
                    r.append(pixelBuffer.getRed(x: x, y: y))
                    g.append(pixelBuffer.getBlue(x: x, y: y))
                    b.append(pixelBuffer.getGreen(x: x, y: y))
                    a.append(pixelBuffer.getAlpha(x: x, y: y))
                }
            }
        } else {
            print("image not format")
        }
        //rgbの入れ替え
        image.image = img.createImage(r: g, g: b, b: r, a: a)
    }
}

class PixelBuffer {
    private var pixelData: Data
    var width: Int
    var height: Int
    private var bytesPerRow: Int
    private let bytesPerPixel = 4 //1ピクセルが4バイトのデータしか扱わない

    init?(uiImage: UIImage) {
        guard let cgImage = uiImage.cgImage,
            //R,G,B,A各8Bit
            cgImage.bitsPerComponent == 8,
            //1 pixelが32bit
            cgImage.bitsPerPixel == bytesPerPixel * 8 else {
                return nil

        }
        pixelData = cgImage.dataProvider!.data! as Data
        width = cgImage.width
        height = cgImage.height
        bytesPerRow = cgImage.bytesPerRow
    }

    func getRed(x: Int, y: Int) -> CGFloat {
        let pixelInfo = bytesPerRow * y + x * bytesPerPixel
        let r = CGFloat(pixelData[pixelInfo]) / CGFloat(255.0)

        return r
    }
    func getGreen(x: Int, y: Int) -> CGFloat {
        let pixelInfo = bytesPerRow * y + x * bytesPerPixel
        let green = CGFloat(pixelData[pixelInfo+1]) / CGFloat(255.0)

        return green
    }
    func getBlue(x: Int, y: Int) -> CGFloat {
        let pixelInfo = bytesPerRow * y + x * bytesPerPixel
        let blue = CGFloat(pixelData[pixelInfo+2]) / CGFloat(255.0)

        return blue
    }
    func getAlpha(x: Int, y: Int) -> CGFloat {
        let pixelInfo = bytesPerRow * y + x * bytesPerPixel
        let alpha = CGFloat(pixelData[pixelInfo+3]) / CGFloat(255.0)
        return alpha
    }
}
extension UIImage {
    func createImage(r:[CGFloat], g: [CGFloat], b:[CGFloat], a:[CGFloat]) -> UIImage {
        UIGraphicsBeginImageContextWithOptions(size, false, 0)
        let wid:Int = Int(size.width)
        let hei:Int = Int(size.height)

        for w in 0..<wid {
            for h in 0..<hei {
                let index = (w * wid) + h
                UIColor(red: r[index], green: g[index], blue: b[index], alpha: a[index]).setFill()
                let drawRect = CGRect(x: w, y: h, width: 1, height: 1)
                UIRectFill(drawRect)
                draw(in: drawRect, blendMode: .destinationIn, alpha: 1)
            }
        }
        let tintedImage = UIGraphicsGetImageFromCurrentImageContext()!
        UIGraphicsEndImageContext()
        return tintedImage
    }
}
出力結果
元画像
R-> G , G -> B , B -> R

R-> B , G -> R , B -> G